ConfigurationOracle Clinical to acess URL (or) Oracle Clinical Remote Data Capture Onsite Guide configuration
1.4 Modifying Files on the Application Server
Required Change You must edit rwservlet.properties; otherwise report submissions and view job status URLs don’t work.
1. Log on to the Application Server.
2. Go to DomainHome\config\fmwconfig\servers\WLS_ REPORTS\applications\reports_11.1.2.1.0\configuration
3. Open rwservlet.properties in a text editor and add the following line below the
C:\Oracle\Middleware\user_projects\domains\FRDomain\config\fmwconfig\servers\WLS_REPORTS\applications\reports_11.1.2\configuration Before changing the file file name is rwservlet.properties
xsi:schemaLocation="http://xmlns.oracle.com/reports/rwservlet file:C:\Oracle\Middleware\Oracle_FRHome1/reports/dtd/rwservlet.xsd"> <server>rep_wls_reports_clinical_asinst_1 <server > <singlesignon>no</singlesignon> < inprocess >yes</inprocess> <!--reports_servermap ></reports_servermap--> <!--cookie cookieexpire="30" encryptionkey="reports9i" /--> <!--defaultcharset ></defaultcharset--> <!--webcommandaccess >L1</webcommandaccess--> <!--allowhtmltags>yes</allowhtmltags--> <!--helpurl>yes</helpurl--> <!--dbauth>rwdbauth.htm</dbauth--> <!--sysauth>rwsysauth.htm</sysauth--> <!-errortemplate>rwerror.htm</errortemplate--> <!--diagtags diagbodytags="reports_servlet_help_file_title" diagheadtags="reports_servlet_help_file_body_tag"/--> <--cluster clustername="ascluster" clusternodes="rep_strep12_two"/--> <!--allowauthid>yes</allowauthid--> </rwservlet> After changing the file
<?xml version="1.0" encoding="UTF-8" standalone="no"?> <rwservlet xmlns="http://xmlns.oracle.com/reports/rwservlet" xmlns:xsi="http://www.w3.org/2001/XMLSchema-instance" xsi:schemaLocation="http://xmlns.oracle.com/reports/rwservlet file:C:\Oracle\Middleware\Oracle_FRHome1/reports/dtd/rwservlet.xsd"> <server>rep_wls_reports_clinical_asinst_1</server> <singlesignon>no</singlesignon> <inprocess>yes</inprocess> <webcommandaccess>L2</webcommandaccess> <!--reports_servermap></reports_servermap--> <!--cookie cookieexpire="30" encryptionkey="reports9i" /--> <!--defaultcharset></defaultcharset--> <!--webcommandaccess>L1</webcommandaccess--> <!--allowhtmltags>yes</allowhtmltags--> <!--helpurl>yes</helpurl--> <!--dbauth>rwdbauth.htm</dbauth--> <!--sysauth>rwsysauth.htm</sysauth--> <!-errortemplate >rwerror.htm</errortemplate--> <!--diagtags diagbodytags="reports_servlet_help_file_title" diagheadtags="reports_servlet_help_file_body_tag"/--> <--cluster clustername="ascluster" clusternodes="rep_strep12_two"/--> <!--allowauthid>yes</allowauthid--> </rwservlet>
3.4 Required Parameters in an rdcConfig.properties File
The rdcConfig.properties file contains global parameters for the RDC Onsite application and their attributed values. There are a number of properties that are required to be included in the rdcConfig.properties file and, of these properties, some may be edited to customize RDC Onsite.
To edit the properties file:
To edit the properties file:
1. Navigate to the OPA_CONFIG_FOLDER as specified in the opa51 registry under HKEY_LOCAL_MACHINE > Software > Oracle.
2. Back up the rdcConfig.properties file.
3. Open the rdcConfig.properties file in a text editor.
4. Make changes as necessary.
Tip: Do not use the Tab key while editing the file, use the space bar instead. Also, do not enter extra spaces either for parameters or values. Make sure that no trailing space is left for any parameter values unless otherwise required.
5. Save the file.
6. Restart the OpaServer for the changes to take effect.
Note: When you suppress the validation error message, RDC Onsite still creates a discrepancy when
rdcConfig.propertiesfile before changing
application_path = c:\\opapps51
dataentry_cache_disk_path = c:\\opapps51/rdc
dataentry_cache_disk_size =
dataentry_cache_distribute =
performanceprofile =
xhrdtime =
dataentry_service_request_timeout = 6000
max_connections_per_pool =
dataentry_reportlog_path = c:\\opapps51/rdc/rlogs
dataentry_log_path = c:\\opapps51/rdc/logs
dataentry_temp_path = c:\\opapps51/rdc/temp
rw_webservice_url = http://clinical:8888/reports/rwwebservice
web_server_url =
max_row_fetched = 1000
rdc_session_timeout = 30
jdbc_ds_name = jdbc/rdccdb.NULLDS
crf_images_path = c:\\opapps51/html/rdc/dcif_images
development_mode = 0
rdcConfig.propertiesfile after changing
application_path = c:\opapps51
dataentry_cache_disk_path = c:\opapps51\rdc
dataentry_cache_disk_size =
dataentry_cache_distribute =
performanceprofile =
xhrdtime =
dataentry_service_request_timeout = 6000
max_connections_per_pool =
dataentry_reportlog_path = C:\opapps51\rdc\rlogs
dataentry_log_path = C:\opapps51\rdc\logs
dataentry_temp_path = C:\opapps51\rdc\temp
rw_webservice_url = http://clinical:8888/reports/rwwebserviceweb_server_url =
max_row_fetched = 1000
rdc_session_timeout = 30
jdbc_ds_name = jdbc/rdccdb.NULLDS
crf_images_path = C:\opapps51\html\rdc\dcif_images
development_mode = 0
run the ocl_add_user.sql script by logggin in to the sql(for script location in linux/unix use locate scriptname ex:$locate cl_add_user.sql

2.2 Check Installation Codelist Values
1. In Oracle Clinical, navigate to Admin, Reference Codelists, Installation Codelists.
2. Query OCL_INSTALLATION and check that the GLIB_LOCATION value is correct. It should match the LOCATION_CODE in OCL_STATE if the database has its own global library.

3. Query SOURCE LOCATION CODE and check the Short Value for the current location. The Long value represents the offset in hours from GMT. Mark any unwanted database entries as inactive

4. Query OCL_DOMAINS and add PQA, for the PQA domain, as the short and long value and the description.

5. If you have an integrated Oracle Thesaurus Management System installation, query OCL_OPTIONS_TYPE_CODE and set value TMS_INSTALLED to Y.
3 Set Up Domain PQA

4 Create Program PQAPROG and Project PQAPROJ
This section describes setup activities in the Oracle Clinical Planning subsystem.
1. Navigate to Plan, Programs.
2. Enter the following values:
Program: PQAPROG
Description: Oracle QA program
3. Click Save.

5. Define the project:
Code: PQAPROJ
Description: Oracle QA project
1. Click Save, then Back, then Exit.

4.1 Create an Organizational Unit
1. Navigate to Plan, Organizational Units.
2. Enter the following values:
Code: OLA
Name: Oracle QA Group
Description: Oracle QA Group
3. Click Save, then Exit.

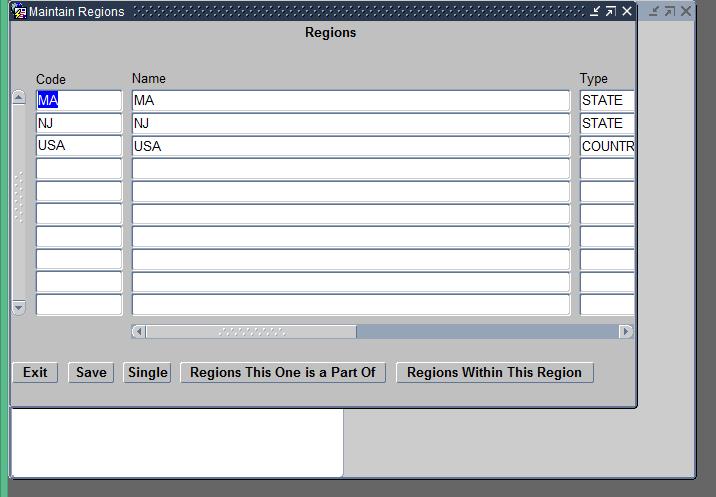
4.2 Create Countries and States
1. Navigate to Plan, Regions.
2. Enter the following values:
Code: USA
Name: USA
Type: Country
3. Enter the following values:
Code: NJ
Name: NJ
Type: STATE
4. Click Save.
5. With the focus on NJ, click Regions This One is a Part of.
6. Enter Code: USA.
7. Click Save.
8. Press Back.
9. Enter the following values:
Code: MA
Name: MA
Type: STATE
10. Click Save.
11. With the focus on MA, click Regions This One is a Part of.
12. Enter Code: USA.
13. Click Save, then Back, then Exit.
5 Perform Study Design Activities
This section describes using the Design subsystem to create a study and its components.
5.1 Create Study OLSQA
1. Navigate to Design, Studies, Easy Study Design, and select Insert Record from the Data menu.
2. Enter the following values for these fields:
Study: OLSQA
Version: 1
Study Title: Oracle LSQA study
Program Code: PQAPROG
Project Code: PQAPROJ
Organization code: OLA
Master Country: USA
Time Unit for Events: Day
Maximum Study Duration: 30
Avail for Replication Flag: Not selected
Patient Reply Rule: NONE
3. Click Save. Oracle Clinical returns the prompt "Is this a Flexible Study?".
4. Click Yes. Oracle Clinical returns a prompt if the study requires Second Pass data entry.
5. Click Yes.

5.2 Create Planned Study Intervals
1. From the Easy Design - Clinical Studies window, click Intervals.
2. Define interval PHASE1:
Phase Name: PHASE 1
Short Name: PHASE 1
Phase Type: SCREEN
Blind Type: OPEN
Minimum and Maximum duration: 7
3. Define Interval PHASE 2:
Phase Name: PHASE 2
Short Name: PHASE 2
Phase Type: DOSING
Blind Type: DOUBLE
Minimum and Maximum duration:14
4. Define Interval PHASE 3:
Phase Name: PHASE 3
Short Name: PHASE 3
Phase Type: DOSING
Blind Type: DOUBLE
Minimum and Maximum duration14
5. Click Save.
6. Click Back.


5.4 Create Patient Positions
1. Click Create PP. In the middle column, labeled Normal Patients, enter:
Start Code: R1
End Code: R20
2. Click Create Patient Positions.
3. Click OK.
4. In the middle column, labeled Normal Patients, enter:
Start Code: R25
End Code: R55
5. Click Create Patient Positions.
6. Click OK.
7. In the middle column, labeled Normal Patients, enter:
Start Code: F101
End Code: F170
8. Click Create Patient Positions.
9. Click OK.
10. Click Back.
11. Click Exit.

5.5 Create Sites
+++++++++WAIT FOR FURTHER UPDATING......................
Thanks for the post. Nice post to read. Here you discuss the fact nicely. If you need to know more about the Clinical Data Management Courses can visit. Keep sharing…. Cheers….!!
ReplyDelete